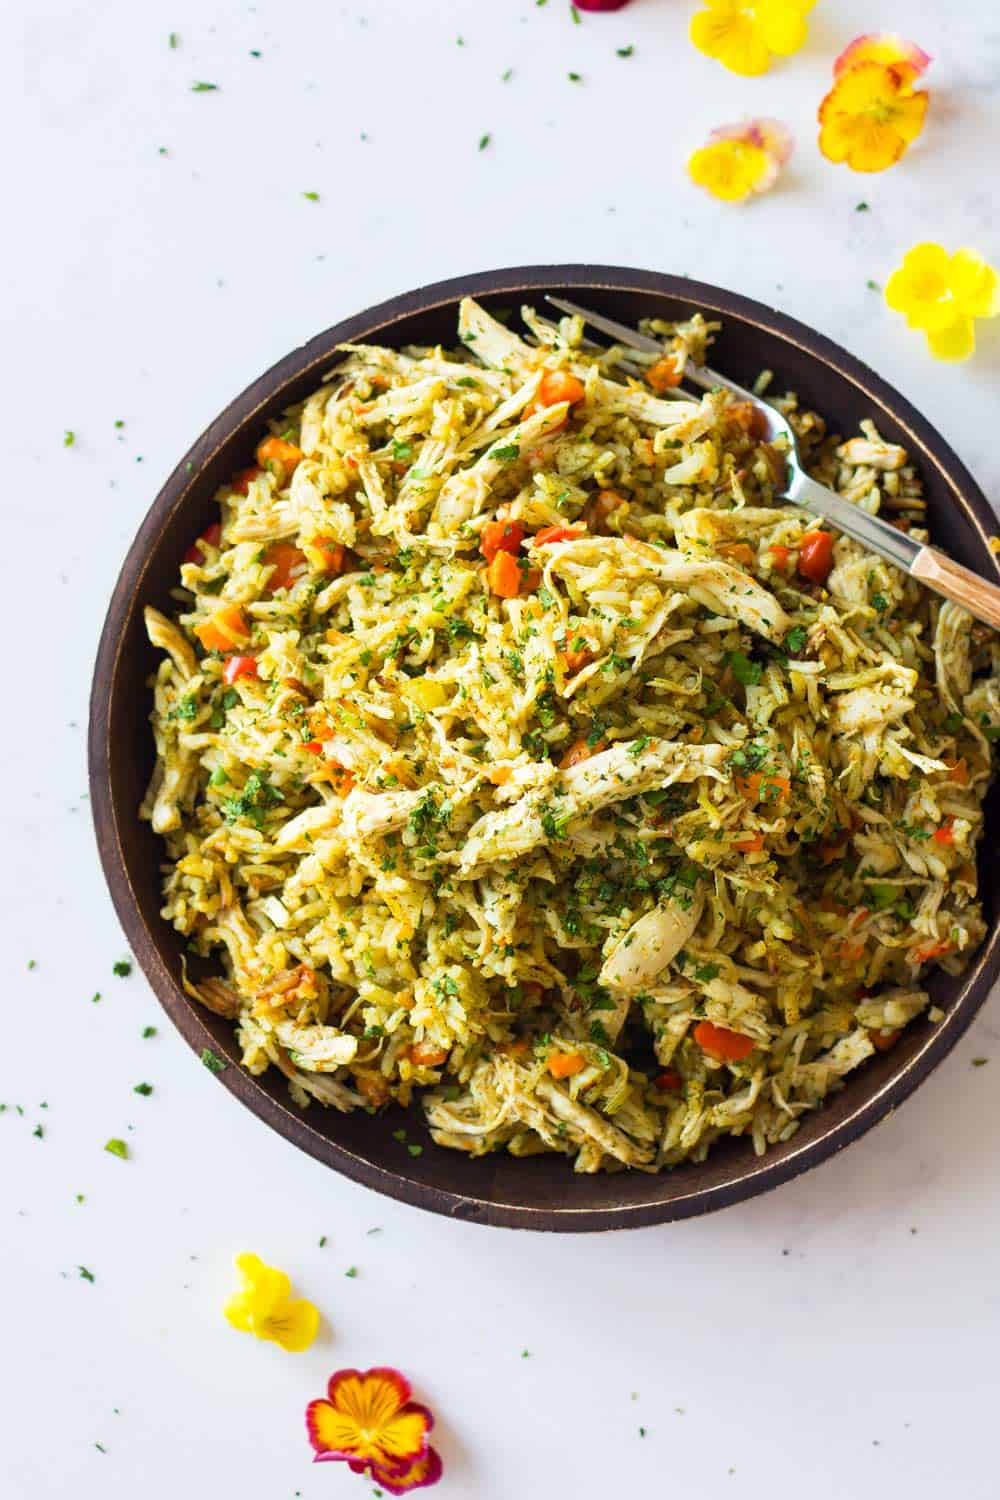
Instant Pot Chicken and Rice is the perfect one-pot dinner recipe. A delicious comfort food to enjoy all year round! Make either chicken breast and white rice or chicken thighs and brown rice.
Save on time and dishes with this quick and easy recipe made entirely in the electric pressure cooker. Two of my most popular Instant Pot recipes are Instant Pot Rice and Instant Pot Chicken. So I decided to combine the two and make a one-pot meal out of both.
The advantage of a pressure cooker is that water doesn’t evaporate. Grains like rice and chicken can be cooked together perfectly because you use less water for the rice while the chicken sits on top and gets cooked with just the steam. The result is a super-duper tender and juicy chicken and fluffy rice.
If you don’t have an Instant Pot though, you can still enjoy this delicious recipe by making regular 1-Pot Chicken and Rice on the stove.
Instant Pot Chicken Breast and White Rice
The original recipe initially was for chicken breasts and white rice cooked together in the Instant Pot. After extensive testing, I found the right amount of cooking time to achieve fluffy rice and juicy chicken. After 5 minutes high-pressure and 10 minutes natural pressure release, the chicken is JUST cooked. It won’t be dry but it shouldn’t be pink at all, just white.
It’s important to note that if your pin drops before the 10 minutes, the pot most likely didn’t get to high pressure and the chicken might be undercooked. Double-check before you start that the sealing knob is in the sealing position, and no air or steam comes out of the knob.
Instant Pot Chicken Thighs and Rice
Some people asked me for versions of the original recipe but using either brown rice instead of white, or chicken thighs instead of breasts. After what feels like a million test trials, I finally got the formula. Yay!
Brown rice takes triple the time to cook than white rice and would dry out the chicken breasts in the process. The secret is to use bone-in chicken thighs with brown rice. The result was absolutely amazing.

Ingredients and Substitutions
- Chicken – use chicken breasts or chicken thighs. I recommend using chicken breasts no bigger than 6.5oz (180g). If too big, cut them into 1” cubes to ensure they cook through. If using chicken thighs, go for bone-in skinless thighs.
- Cilantro – you’ll need 1 whole bunch of fresh cilantro to make the flavorful cilantro water for the rice. I suggest you don’t replace it, but if needed, you could use parsley. Just keep in mind that it has a slightly stronger flavor.
- Avocado oil – I recommend using a high-smoke point fat, such as avocado oil, ghee or bacon fat. This is important so the fat doesn’t burn at the bottom of the Instant Pot.
- Onion – use one small white or yellow onion.
- Garlic – you will need two cloves.
- Rice – use white basmati or brown basmati rice depending on what piece of chicken you’ll be cooking. I don’t recommend using any other type of rice because they need different cooking times on the Instant Pot.
- Carrots – a staple in many rice recipes. 1.5 or 2 medium carrots should yield a cup when chopped. You can also use baby carrots.
- Celery – when cooked, celery adds great flavor. For this chicken and rice recipe, you will need 2-3 celery stalks.
- Red bell pepper – the more veggies the better. I love red bell pepper for its color and texture. Orange or yellow bell pepper work great too.
How to Make Instant Pot Chicken and Rice
- Season Chicken – add sea salt and pepper generously to both sides of chicken breast or chicken thighs. Set aside.
- Prep Veggies – peel and dice the carrots. Deseed and dice the red bell pepper, and dice the celery. Also, finely chop a medium onion and two cloves of garlic.
- Prep Cilantro Water – add a bunch of cilantro and 1 cup of room-temperature water into a blender. Blend until completely smooth and no bits of cilantro are left.
- Preheat Instant Pot – press the “Sauté” button on the panel to preheat the pot.
- Sauté Onion and Garlic – once the Instant Pot display says “hot”, add a drizzle of oil or fat and then add the chopped onion and garlic. Sauté until translucent.
- Add Remaining Ingredients – this is a very important step and you need to work fast! Once the onion and garlic are ready, add the rice, season with salt and pepper, then add the cilantro water. Give a quick stir, then add the diced vegetables on top of the rice (make sure not to mix them in). Then, place the chicken on top of the veggies and close the lid immediately. The reason for this is to avoid too much water from evaporating so you don’t get the nasty “burn warning” on your Instant Pot. (See my tips to avoid the burn warning below).
- Set the Instant Pot – Seal the pot lid and turn the pressure valve to the “sealing” position. then press the “Cancel” button. Now press the “Manual” button and select 6 minutes high pressure if you’re cooking chicken breast with white rice. Or select 22 minutes high pressure if you’re cooking chicken thighs with brown rice instead.
- Release Pressure – once the Instant Pot beeps, wait for full natural pressure release. This can take anywhere from 15-25 minutes until the safety pin drops on its own.
- Shred Chicken and Serve – when the Instant Pot chicken and rice is finished cooking, open the lid and shred the chicken using two forks. Then mix everything together and serve immediately. Sprinkle some chopped cilantro on top and dive in!
Tips To Avoid The Burn Warning
Sometimes Instant Pots can be finicky and give you the Burn Warning even when you think you made everything right. After some trial and error, I found some tips that will help you avoid the burn warning:
- Don’t skimp on the fat for sautéing the onion and garlic. Be generous.
- After sautéing the onion and garlic, make sure there are no burnt bits and pieces stuck to the bottom of the pot. If necessary add a splash of water and deglaze the bottom with a wooden spoon to scrape everything off.
- Have ingredients already measured out and ready to go so no time is wasted. This is especially important for the diced vegetables. Have them chopped and all in one bowl ready to add.
- Once you add the rice, add the cilantro water immediately and stir. Do not let the dry rice sit on the hot bottom of the pot without liquid for more than 5 seconds.
- Do not mix the vegetables and chicken in the cilantro water. Let them sit on top of the rice.
- Put the lid on quickly. The longer it takes to close the pot, the more liquid evaporates. This increases the chance to get the burn warning.
Frequently Asked Questions
Absolutely! As long as you choose the right cooking time to ensure either are well cooked through it is perfectly safe to cook both at the same time.
Yes! As long as you make sure chicken reaches 165F internal temperature it is 100% safe to add to the Instant Pot.
If you add dry or rinsed rice to an already preheated or hot Instant Pot and don’t add liquid to it at the same time or very quickly after your rice will immediately stick to the bottom and start burning.
Instant Pot Chicken and Rice
Equipment
- instant pot
Ingredients
- 2 5oz / 10 oz chicken breasts / bone-in skinless chicken thighs - (Either 2 five-ounce chicken breasts if you are making the recipe with white rice. OR. 2 ten-ounce bone-in chicken thighs if you are making the recipe with brown rice.)
- 1 bunch cilantro
- 1 cup water - (at room temperature, not cold!)
- 1/2 Tbsp ghee or bacon fat or avocado oil
- 1 small diced onion
- 2 cloves garlic
- 1 cup white basmati rice or brown basmati rice - (choose white or brown depending on the type of chicken you are using)
- 1 cup diced carrot
- 1 cup diced celery
- 1 cup diced red bell pepper
- Salt
- Pepper
- cilantro for garnishing
Instructions
- Generously season chicken with salt and pepper on both sides and set aside.
- Peel and dice carrot, dice celery, deseed and dice bell pepper.
- Add cilantro and room-temperature water into a blender and blend until completely smooth.
- Peel and chop onion and garlic.
- Preheat Instant Pot by pressing the “sauté” button.
- Once the Instant Pot's display says "hot": add fat or oil, chopped onion, and garlic, and sauté until translucent. Stir often. Make sure no burnt bits of onion or garlic are stuck to the bottom of the pot. If for some reason there are, deglaze by adding a tablespoon or two of water and scrape with a wooden to remove all bits from the bottom.
- Now work fast: add rice, salt and pepper to Instant Pot and then pour in cilantro water and give it a quick stir. Add diced vegetables on top in one layer (do not mix in!) and then top with seasoned chicken breasts. Then IMMEDIATELY close lid to avoid water from evaporating (<-important!)
- Turn venting knob to "sealing", hit "cancel" and then "manual" and adjust to 6 minutes high pressure for chicken breast / white rice version OR 22 minutes for chicken thigh / brown rice version.
- Wait for full natural pressure release. This means once the pot beeps don't do anything. Don't touch the valve and instead just wait for the safety pin to drop on its own. This can take anywhere from 15-25 minutes.
- Open the pot and enjoy the smell! Then use two forks to shred the chicken. Mix it all and serve immediately with some fresh cilantro sprinkled on top.
Notes
- *Please read the blog post section where I go into detail about what to pay attention to in order to succeed to avoid any error messages from the pot.
- nutritional info is for white rice and chicken breast.
Nutrition
 Juicy Healthy Baked Chicken Breast Recipes
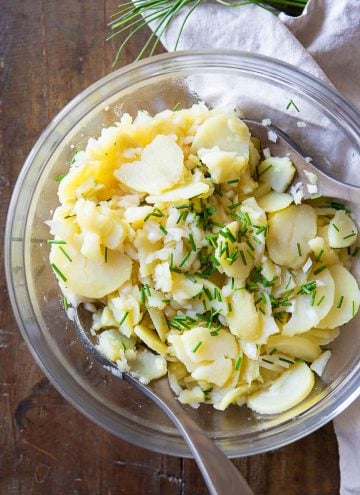 Grandma’s German Potato Salad
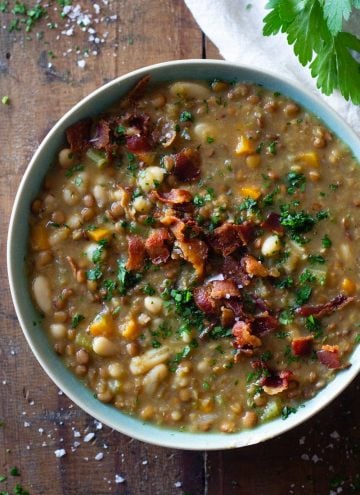 Amazing Crockpot Lentil Soup
Timothy says
This is my first attempt at an Insta Pot recipe. I wish I’d read all the comments as I too have been getting “burn” warnings. Each time I removed the ingredients into separate bowls, used Saute (medium) to deglaze the single layer of scorched grains with 1c water and pour the water over the rice (as a way to retain flavor while adding water). Then I wash the instant pot bowl to ensure nothing at all is stuck before adding the ingredients back in and trying again. I’m about to try for the fifth time before giving up as I’m afraid the amount of water will make the rice mush at this point. I have the Instant Pot Ultra 6qt. As others have noted, my manual says a minimum of 500ml of liquid is required but I know I’ve added at least that much just trying to salvage the recipe.
Timothy says
Just to follow up, the final time also failed with Burn warning but I was able to throw everything into a pan and finish on the stove. The flavors were good and I’d liked to figure out how to make it work. Upon further investigation, my user manual states for the “burn” warning: “Starch deposits at the bottom of the inner pot have clogged heat dissipation. Stop the cooker and inspect the bottom of the inner pot.” Several posts I’ve seen on Reddit suggest adding the ingredients in reverse solved the problem for some recipes.
Lorena says
PLEASE let me know when you try in reversed order how it went. If you solved the mystery for me you get a virtual hug all the way from Montreal to your place!!!!
Lorena says
Timothy, I’m so sorry you’re having so much trouble. How long have you had your Instant Pot and how often have you used it? Have you gotten this message before? After troubleshooting with Instant Pot (the company) directly as to why this is happening and them analyzing my recipe and saying there shouldn’t be any reason for it to trigger that warning I came to the conclusion that some IP simply heat up much faster than others. Did you watch the video I made for this recipe? I’m using a 6qt Duo AND a 6 qt Ultra and it works in BOTH. The burn warning is an absolute mystery to me and I’m so sorry some of you get it and can’t seem to be able to make my recipe. I’m at a complete loss as to how to help with this. My notes section in the recipe has become a foot long trying to solve the mystery :(
Deb says
I made the brown rice recipe but used frozen chicken breasts instead of thighs. I used 2 cups of rice and 1 3/4 cups broth. It came out perfect. The large frozen chicken breasts were perfectly cooked. This is now going to be my weeknight forgot to thaw the meat standard.
Tanner says
Great recipe!
New pressure cooker convert here. First time making this dish and it turned out really well. I doubled the recipe (white rice / breasts) and had no issues. Using rainbow carrots and colorful peppers with a cilantro garnish made for a wonderfully colorful presentation.
I’ll be adding this to my rotation.
tina says
hi i have 9 in one instant pot i havent made this yet how much water or stock and rice.would i have to use could cut up the chicken before hand would still work.
Lorena says
Hi Tina, the recipe shouldn’t be any different with a 9-in-1. Is it 6qt? You simply have to check what the minimum volume is for your pot and then make at least that. If your pot calls for miniumum 2 cups of water you simply have to double my recipes but follow all the other steps the same. No extra time necessary. The important thing is to follow every step as described to be successful.
Terry Holland says
I prefer chicken thighs with the bone in and the skin on. You didn’t mention “skin on.” I also would prefer white basmati since I’ve got a lot of it. Will that work?
Lorena says
I like my chicken with skin on too when making in the oven and it crisps up. In the instant pot it doesn’t crips up however, it just becomes a super soft leathery type skin and I don’t like it so I remove it altogether. White rice and chicken thighs won’t work I’m afraid. White rice need very little time to cook and the thighs won’t cook in that short amount of time. If you use the time needed for the thighs, the white rice will get dry and probably stick to the bottom.
Joan says
Frozen boneless thighs work for me. But no delicious skin in the crockpot.
Lorena says
Ohhh, that’s smart!! Never thought of adding frozen to crockpot. The skin is also gross when cooking it in the Instant Pot. That’s why I remove it either before or after pressure cooking. I only eat the skin when it’s been roasted in the oven and nice and crispy.
Jeremy says
Man this is so good. I ran out of carrots and didn’t blend the cilantro, but it was still amazing. I could eat this forever. I’m gonna stock this up for the week, so I’ll be trying it (made correctly this time), and I’m going to try both versions.
Carla says
I have an 8 qt. IP and it did not come to Pressure and the rice scorched on the bottom. I’m going to try again with more water. I do agree with you that the different sized pots cook differently. Thanks!
Lorena says
Carla, the 8 quart calls for 2 cups water as a minimum, which is why I specified in the recipe that you have to cook the minimum amount specified in the instruction manual of your instant pot. That would be 2 US Standard Cups of rice with 2 US Standard Cups of water. If that works, I’d really appreciate it if you could come back and change the rating of my recipe :)
SVMiller says
This was my first ever Instant Pot recipe and it was a huge success! I was really worried the chicken would come our raw, or the rice too sticky or crunchy, but everything was fine! I made sure to follow the notes/suggestions you provided based on others’ not having success with the recipe. The one change I want to share is that I used short grain brown rice and it still worked perfectly with the timing and proportions you provided for Basmati brown rice/thighs. I also added a tiny bit more water and it ended up creating a nice brothy/saucy texture to the rice. The whole thing was relatively easy, efficient, and so flavorful! Thank you so much for your hard work.
Kris says
Forgot to rate the recipe before submitting. This is excellent as a recipe “template” for a meal of bone-in thighs, rice and vegetables. As much as I love trying different recipes, it is great to have a nutritious and delicious go-to that you can memorize, and this is a good one! Variations can happen in the way you season the liquid (I did not make cilantro water although it sounds like a great idea); and in the veggies you choose.
Lorena says
Thank you so much for your wonderful comment Kris and yes, you are absolutely right. You can mix up the liquid, add seasoning, exchange the vegetables….the possibilities are endless :D
Kris says
This recipe attracted a lot of attempts and feedback, all of which were so helpful to me. Thank you, Lorena and fellow Instant Potters!
This was a success for our little family. Delicious! After reading all the comments, and being a relative Instant Pot newbie but long-time cook), I decided to try a couple minor tweaks because I too have had some random encounters with the BURN display message! I use the Duo 6-quart model.
Used four chicken thighs, bone-in, skin off. “Average” size – as the recipe indicates, they went on top, and the four thighs covered the surface without crowding. Seasoned with salt and paprika.
Used about 1.5 cups of liquid seasoned with Better than Boullion; generous teaspoon of dried parsley, and generous teaspoon of dried basil. Also about a half teaspoon of ground cardamom.
I used brown basmati rice and gave it a good rinse and draining first. When I added the rice to the onions/garlic, I stirred it around and let it also saute a bit so that the grains were well coated. Then, added about a 1/2 c. of the liquid. When it started simmering, gave it a quick stir, scraping bottom, and added 1 cup of frozen green peas. Then, the combined cup of diced carrots and a diced green pepper went on top of the peas. Didn’t stir in the veggies.
Then the seasoned thighs on top, and poured the remaining liquid in.
22 minutes on ‘pressure cook’ setting. 10-12 minutes of natural release then venting.
It was excellent! Not much excess liquid. Next time, I’d make the diced pepper slightly bigger; these were just slightly mushy. Red pepper would be great. The other vegetables, the rice, and the chicken were perfectly cooked.
And I want to try to do the veggie chopping in advance next time; this would make it a much quicker process after work.
Enough for a total of four meals.
Anonomyus says
Do you think altitude could play a part? I know you have to increase cooking time the higher the altitude so I would also assume you would need to increase the water the same amount as well.
Lorena says
From experience from a friend living at 2,000m (7,000 ft) above sea level we have discovered that a spaghetti squash can take up to 2 minutes longer to cook to the same consistency. The water content should “in theory” not have to be increased for rice cooking because the instant pot maintains constant pressure and thus no water evaporation occurs. If you live at 2,000m (7,000 ft) or more above sea level I suggest increasing high-pressure cooking time by 2-3 minutes while maintaining rice to water ratio.
AK says
Just bought an IP, going to give this a go as my first recipe. Would this recipe work with chicken breast and brown rice? Or, does the cooking time for the brown rice over cook the chicken? Just curious, I like brown rice more. (Also, sorry, newbie question: to naturally release pressure, do I simply flip the knob from sealing to vent?) can’t wait to try this! Thanks
Lorena says
Hi!! I’m so excited for you, the Instant Pot is an amazing kitchen tool!! Here to your questions: I’ve had readers comment that they made brown rice with chicken breasts and that it turned out perfectly well. You have to use the 22 minute method though because otherwise the rice doesn’t cook through. For ME (and my taste spuds) the chicken is overcooked and a little dry but then again I’m one of those people who like their chicken juuuuust cooked. Moving the valve from sealing to vent is called “quick pressure release”, this is what you DON’T want to do in this recipe. Natural pressure release is simply leaving not touching the Instant Pot at all when it beeps to tell you it’s finished cooking under pressure. You leave it be and it releases pressure very very slowly on its own. About 15-20 minutes after the beeping the safety pin drops on its own and you’ll be able to open the lid. I hope you are successful with this recipe. If for some reason you have the same problem a couple of my readers with the Instant Pot giving you a “burn” warning message, turn it off, “quick pressure release”, open it up, add a little more water, give it a good stir to remove everything that could be stuck to the bottom, put on the lid again and program it again.
AK says
White rice it is. Thanks so much for the helpful tips!
Hannah says
Can I adjust this for the instant pot duo mini?
Thank you!
Lorena says
Hi Hannah, unfortunately I don’t have that one so I’ve never tried my recipe in that one. If I were you, I would follow the instructions just as they are and keep fingers crossed, then next time adjust timing accordingly.
Nancy says
Hi Hannah…and anyone reading… Would you pls let us know how this worked in the IPOT Mini…I want to try it :) Any adjustments for that size…someone pls share your experience…THANKS much!
Megan says
I haven’t had my instant pot long but this is by far the best I’ve made in it! It was shockingly flavorful. I added about 1/2 cup chicken broth in addition to the water. I used two large chicken breasts, halved them, and cooked for 8 minutes with 10 natural release. Might do 7 minutes best time but otherwise, it was great! My husband and picky toddler liked it too!
Jen says
Oh. My. Goodness!!!! This recipe is absolutely delicious. This is my third recipe in my Instapot and it came out amazing. I used boneless skinless thighs and brown basmati right. I doubled the rice/water and the chicken. I cooked it for 22 minutes as you instructed and it came out perfectly. Thank you for sharing. My family will be wanting this dish again real soon!
Kathy Adkisson says
I used long grain white rice, used 1 cup veggie broth made from “better than boullion” and 1 cup water. I sautéed onion in ghee, added carrots and celery. When it started sticking and browning I addeded a little veggie broth to deglaze and cook a bit more. I then added rice and browned it a bit before adding all the liquid and chicken tenders. I cooked manual for 10 minutes, slow release for 10 minutes. It didn’t stick at all and came out perfect. Awesome recipe, my daughter really liked it. I think I will be adding broccoli to it next time and try it with my non dairy cheese sauce. 👍😄