
Step by step tutorial with photos for a fool-proof homemade apple yeast bread made with fresh apples. The best bread you’ll ever try!
Most apple bread recipes are made with simply baking powder and the consistency is, um, no, just NO! It’s not like bread!! It’s like banana bread but not as good. Banana bread can be a dessert and “caky” (is that a word). Apple bread should be a “real” bread though in my opinion. A yeast bread!
Let’s get to the step-by-step instructions here:
Make a starter
Bread made with a starter is beyond delicious and so much superior to any other form of bread! The consistency of a bread made with a starter is completely different. Make a starter. Just do it!
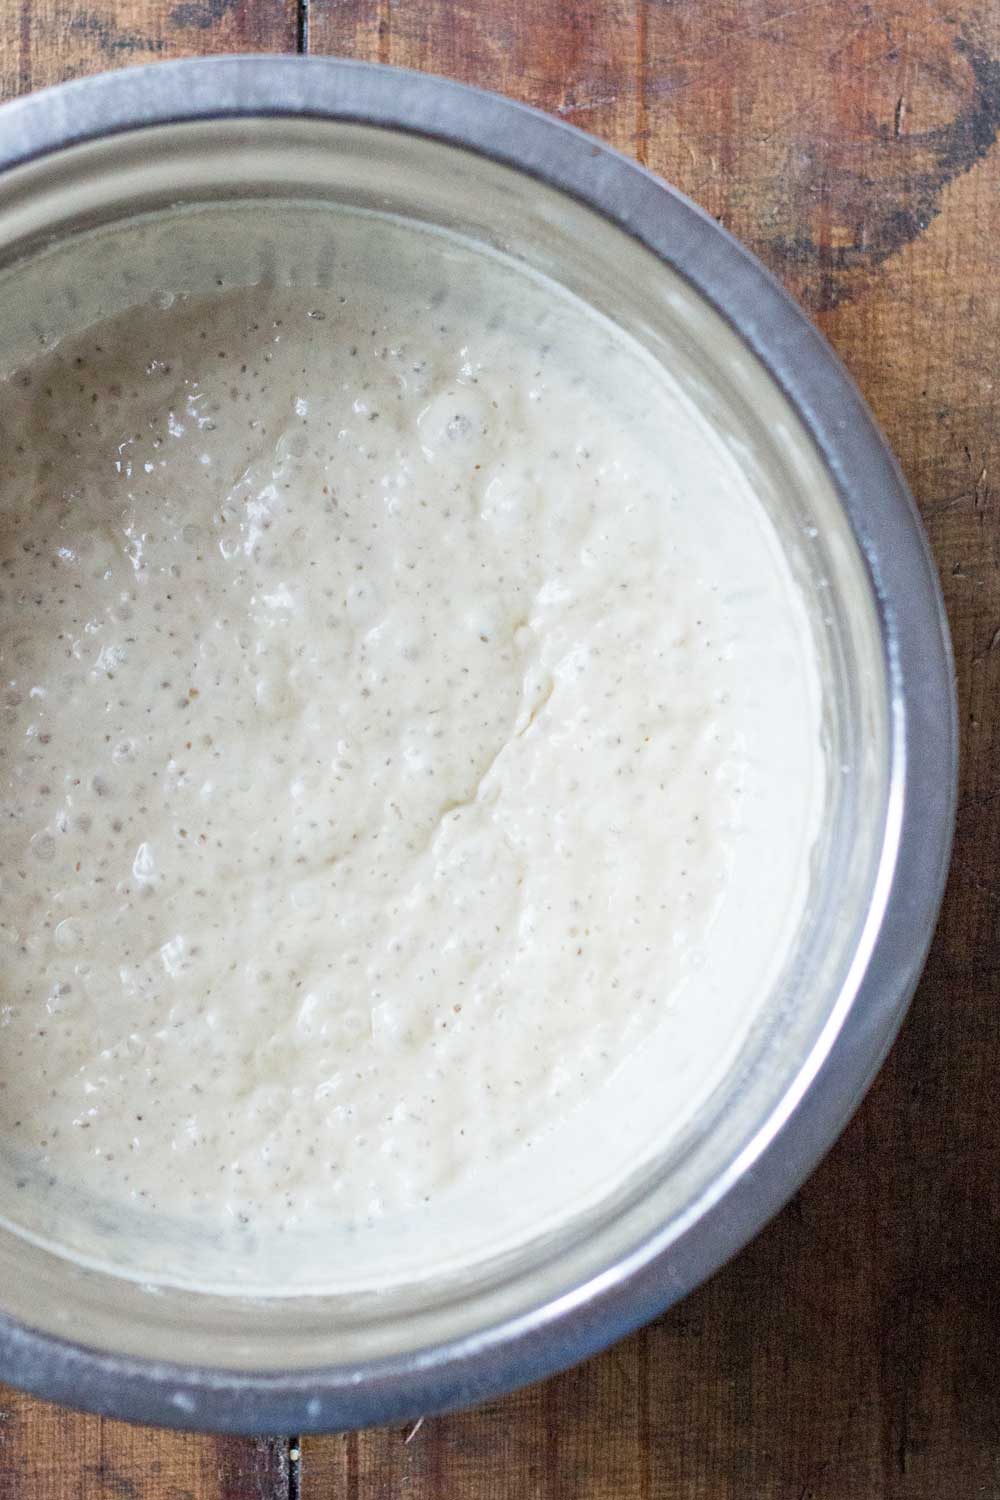
Mix the necessary ingredients and leave at room temperature for at least 12 hours. Let the yeast do its magic.
After 12 hours of leaving the flour and proofed yeast in a bowl covered with a kitchen towel at room temperature, it should look like this (if it doesn’t you didn’t proof your yeast, naughty you!).
Make it an “Artisan Bread”
Artisan yeast apple bread requires several rises. This specific bread calls for a 12-hour rise of the starter and then two 45-minute rises.
Remember, you don’t have to do anything at all while the bread is rising. Making bread is a long process BUT only requires a couple of minutes of actual work in between rising/resting time. In total, you put in maybe 10 minutes of active work here.
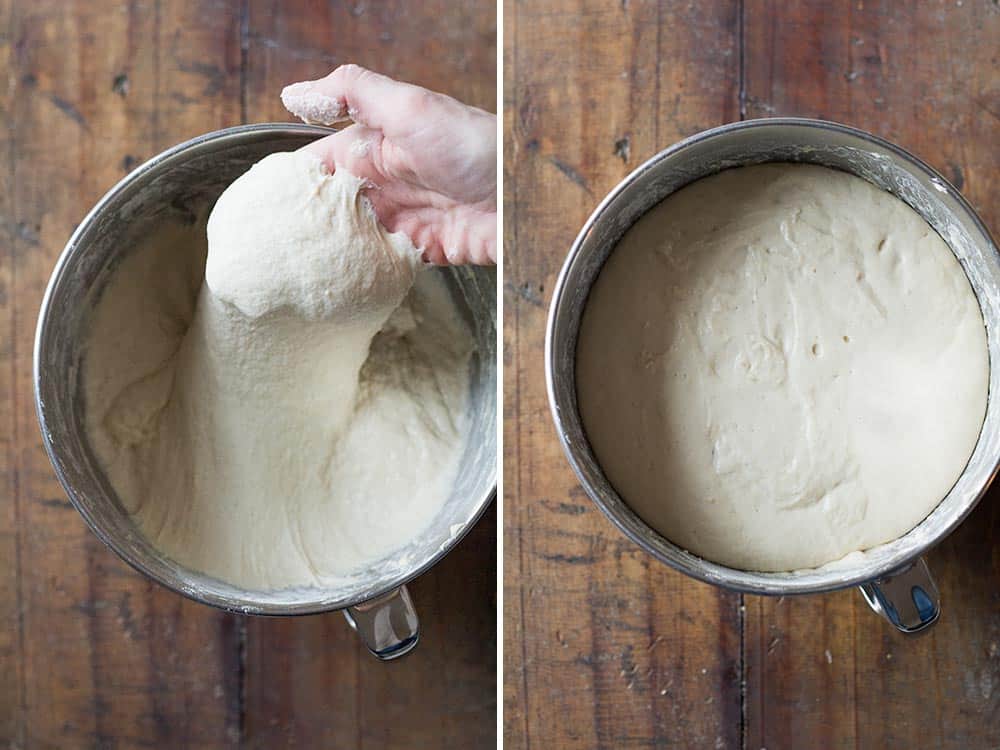
Use a stand mixer to knead the starter and rest of ingredients with a dough hook attached for a good 20 minutes on low. This is so the gluten is activated. You can’t do this by hand. The dough is too sticky and also, you’d need a bodybuilder’s muscle to make it through 20 minutes of kneading. If you don’t have a stand mixer ask around and borrow one from a friend.
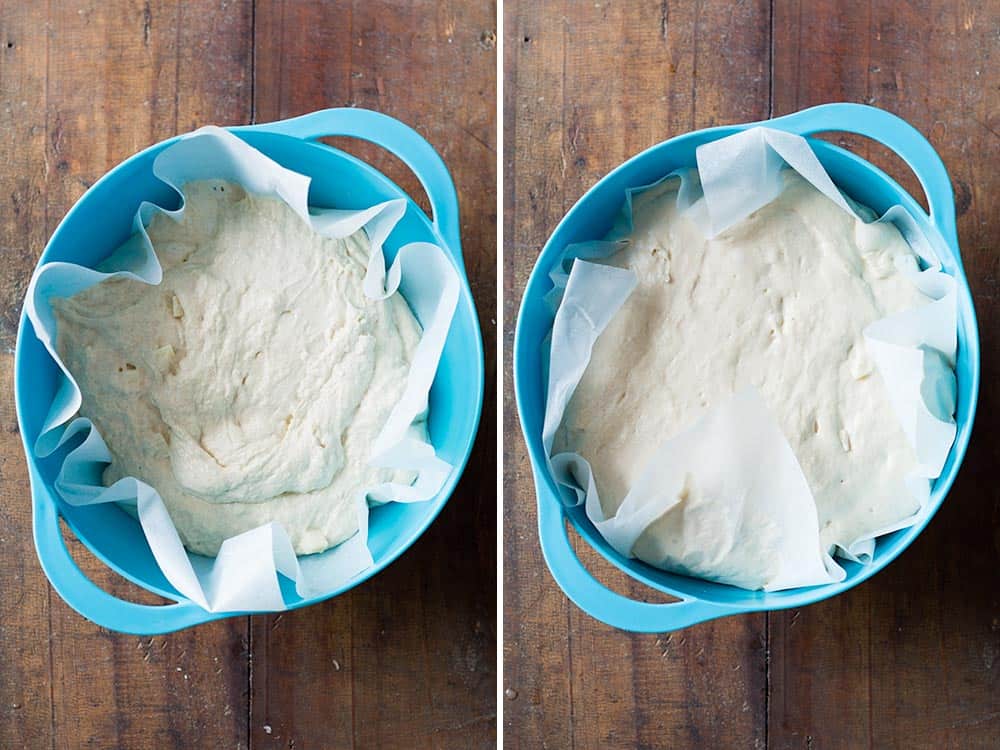
The dough should end up very sticky and elastic (left photo). Cover it with a clean kitchen towel and let rise at room temperature for 45 minutes or until the dough has doubled in size (right photo).
When and how to add fresh apples to the bread dough
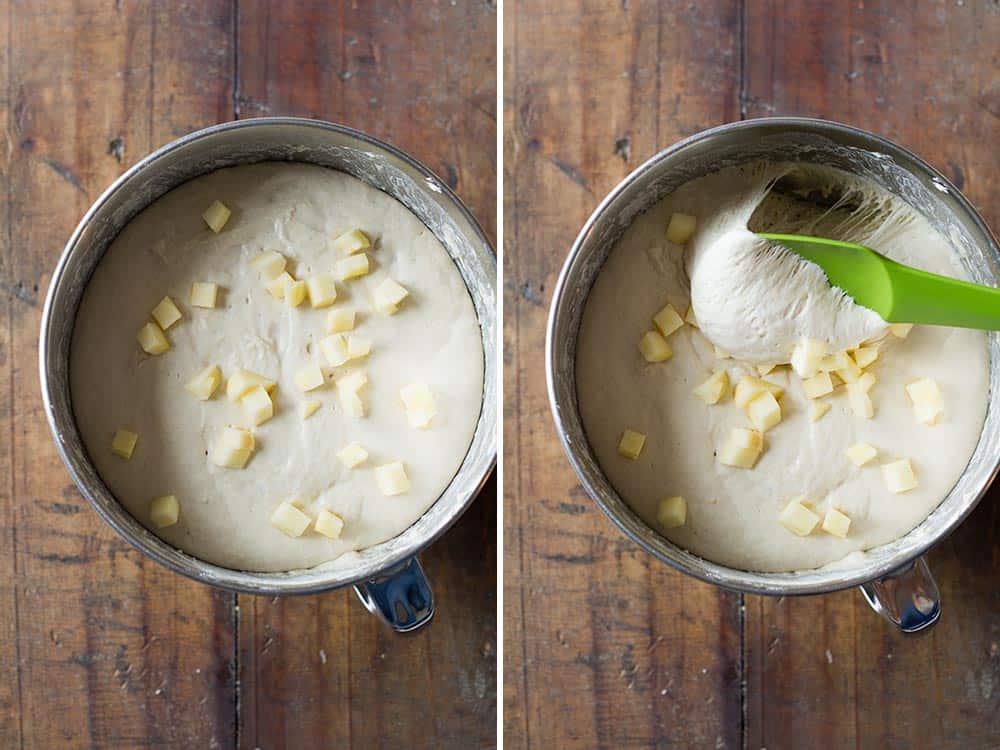
After the first rise, it’s time to fold in the fresh apples.
I recommend adding the apples this late in the process to avoid fermentation. If you add the apples in earlier it will ferment and make the dough pretty sour. I wonder also if the dough would even rise the first time due to the weight of the apples. It’s best to let the dough rise first, then add apples, then let it rise again.
Add apples and fold and fold until well combined. By then the dough reduced in size again. Tadaaa, the photos for how to add fresh apples to healthy apple bread:
You can leave the dough in the same bowl for the second rise but I prefer dumping it into another parchment paper-lined bowl for easier and risk-free transfer into the burning hot dutch oven later.
It’s so much easier to lift the dough out with the parchment paper and then turn around and dump in the dutch oven. I guess you could even dump it in just like that with the parchment paper at the bottom. I prefer to remove. Just in case. So it doesn’t stick?
Anyway. I dump it into a parchment paper-lined bowl, cover with the kitchen towel again and let it rise a second time for about 45 minutes. 15 minutes into the second rise I turn on the oven with the dutch oven inside for it to heat up properly.
Dutch oven vs. no dutch oven when making bread
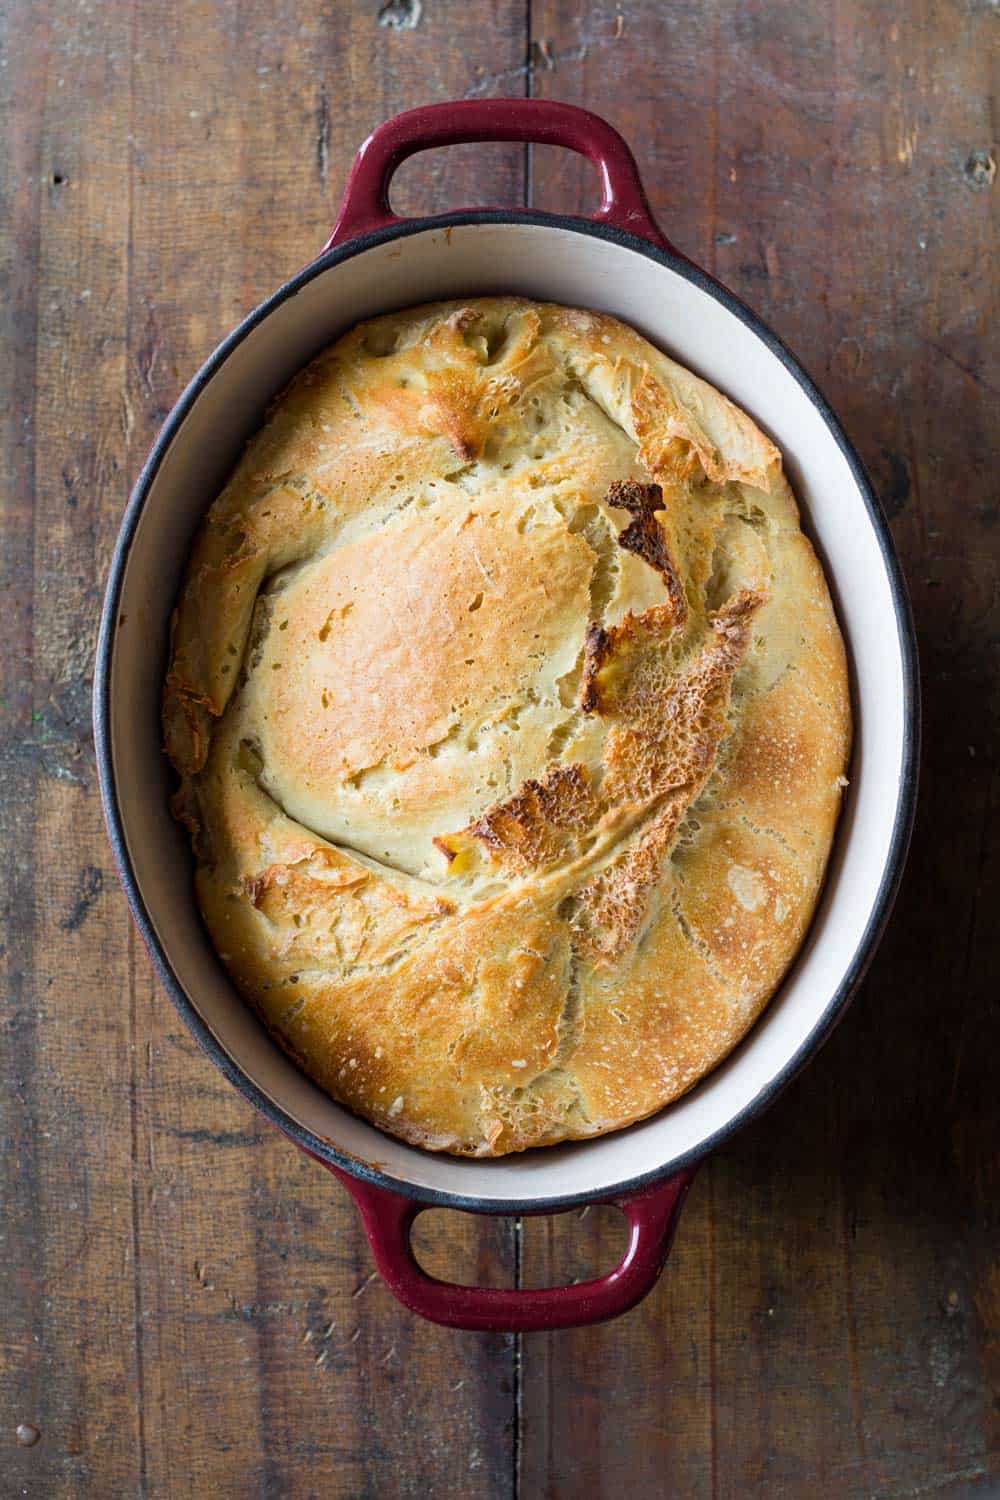
There are two reasons apple yeast bread or any yeast bread really will form a dome. One, the bread dough is given enough opportunities to rise. Two, the bread dough is baked in strong heat coming from all directions. Most of us have regular ovens. Heat from the top and heat from the bottom. That’s it. Regular home ovens do not emit heat from all around. Bakeries have special ovens. Many of their ovens are stone ovens where the stone retains all the heat and radiates it back to the whole surface of the bread.
The only way to “imitate” this is by using a dutch oven. I’ve tried with a oven-proof stainless steel pot with oven-proof glass lid and … it doesn’t work. Stainless steel doesn’t “store” heat. It becomes hot, yes, but as soon as you take it out of the oven to dump in the bread dough, it immediately starts cooling down. A cast-iron pot keeps the heat for muuuuch longer. Enough time for you to dump in the dough, put the lid back on and transfer back in the oven without it cooling down even 1 degree.
Now, if you don’t have a dutch oven, don’t go run and buy one. They are quite pricey. Ask around if someone can borrow you theirs (<- that’s what I did by the way. Thank you Sophie! :) OR if nobody can borrow you one just use your cast iron pan (I’ve done that before with this No-Knead Bread). If you don’t have either, use a baking sheet. Your bread will not produce a beautiful dome. It will for sure still taste absolutely amazing though.
One important tip: be really, really, really, really, really, really careful when taking the dutch oven out of the oven. It will be BURNING HOT! Use very thick silicone oven gloves or double up your regular cloth gloves. The burns you get from a hot dutch oven are unbelievably painful. All concentration is required here. Don’t multitask at this point. Do only ONE thing. Keep your eyes only on the oven and your body parts.
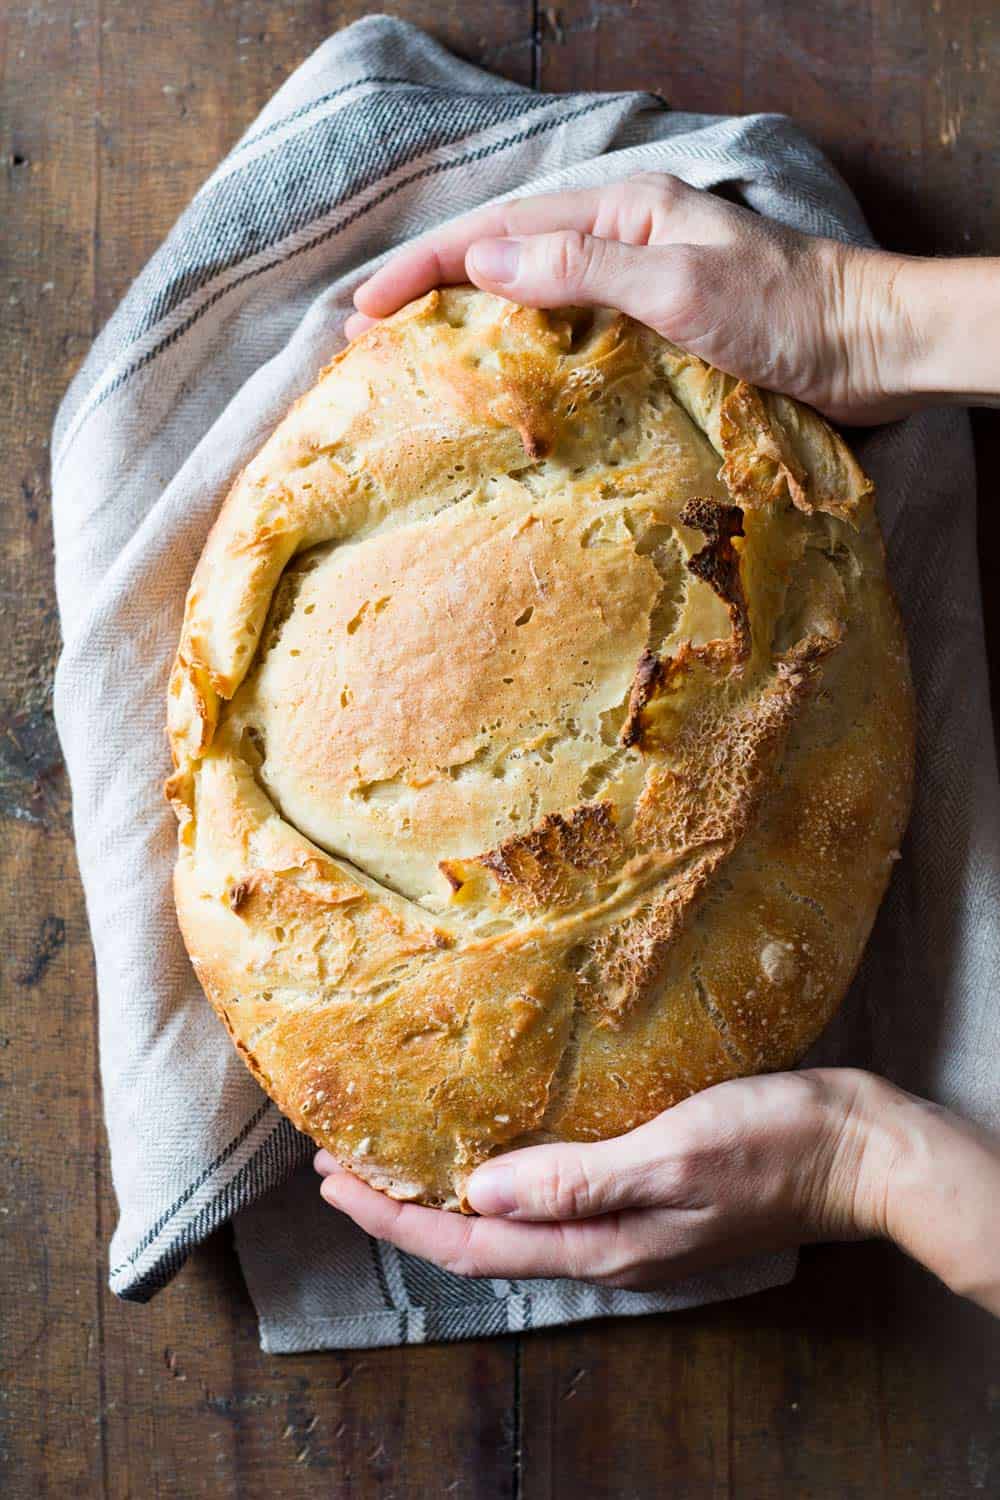
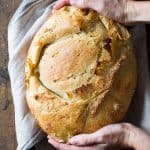
Apple Yeast Bread cooling instructions
This point is also very important. Once the apple yeast bread is baked you have to remove it from the dutch oven (carefully, remember it’s hot!). Since the dutch oven retains a lot of heat for an extended amount of time it’s crucial to remove the bread so it doesn’t continue baking. Otherwise it will become very hard. Turn the dutch oven over so the apple bread falls out. It will immediately and easily fall out. There is no way bread dough will stick to a burning hot cast iron pot or pan. If it sticks, you didn’t heat it up enough time (as I suggested further up) naughty you ;)
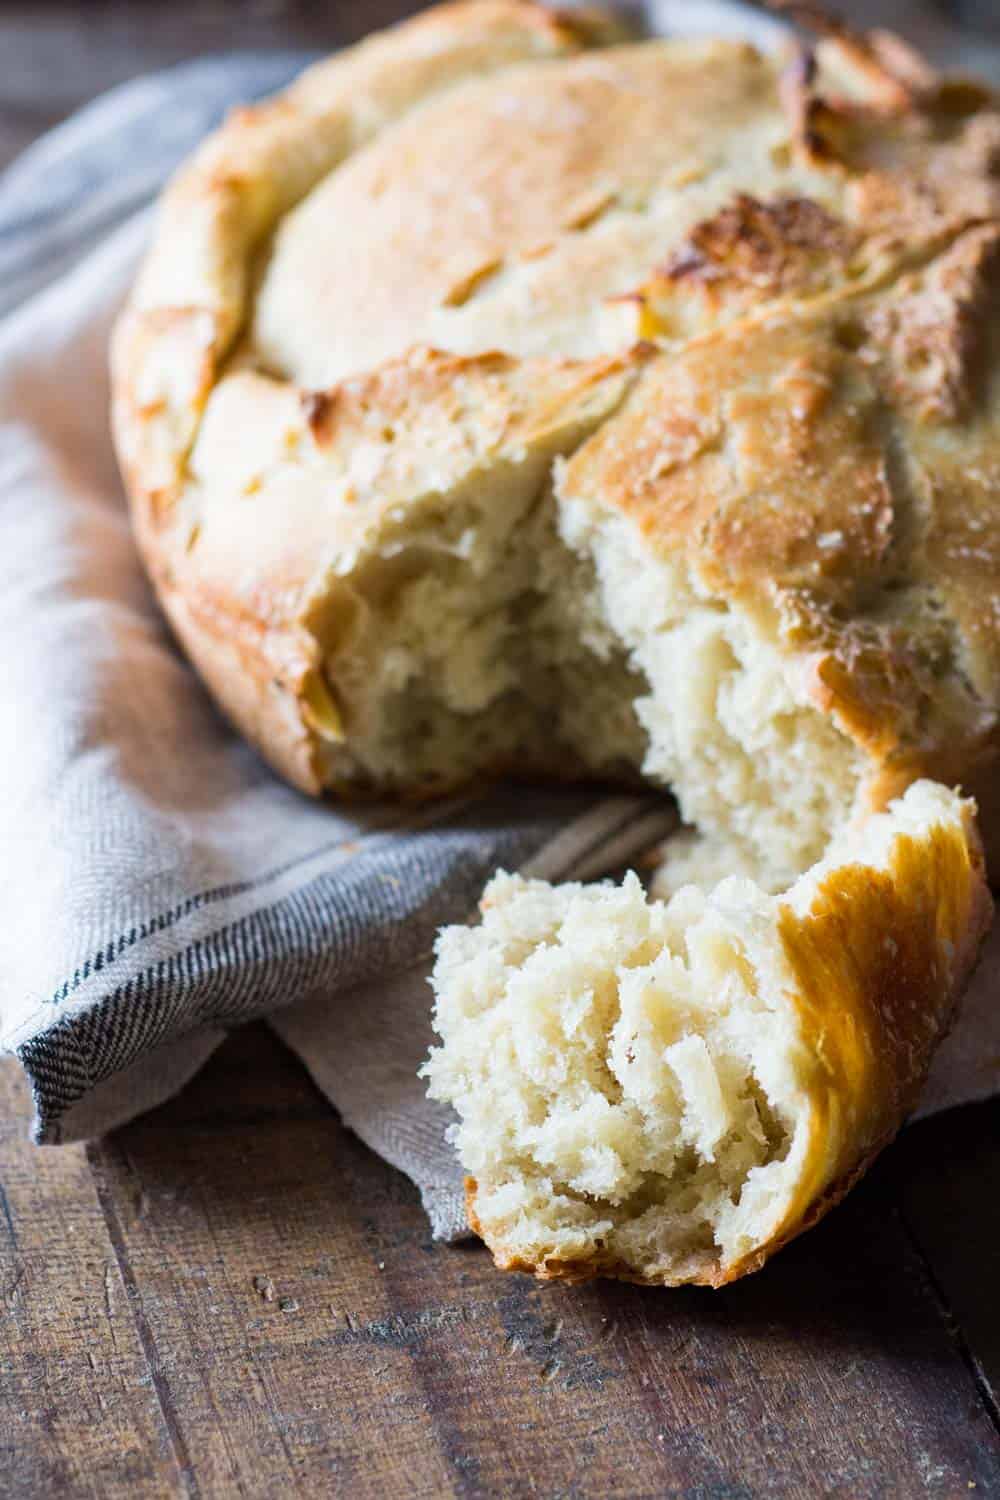
Place the freshly baked bread on a cooling rack and wait for it to COMPLETELY cool down before cutting into it. If you cut into hot bread all the steam escapes and the center stays “doughy”. The bread needs to cool down slowly for the steam to do it’s work on the inside of the apple yeast bread.
How to store Yeast Bread
It’s time to finally, finally break apart a piece of this masterpiece of a healthy apple bread.
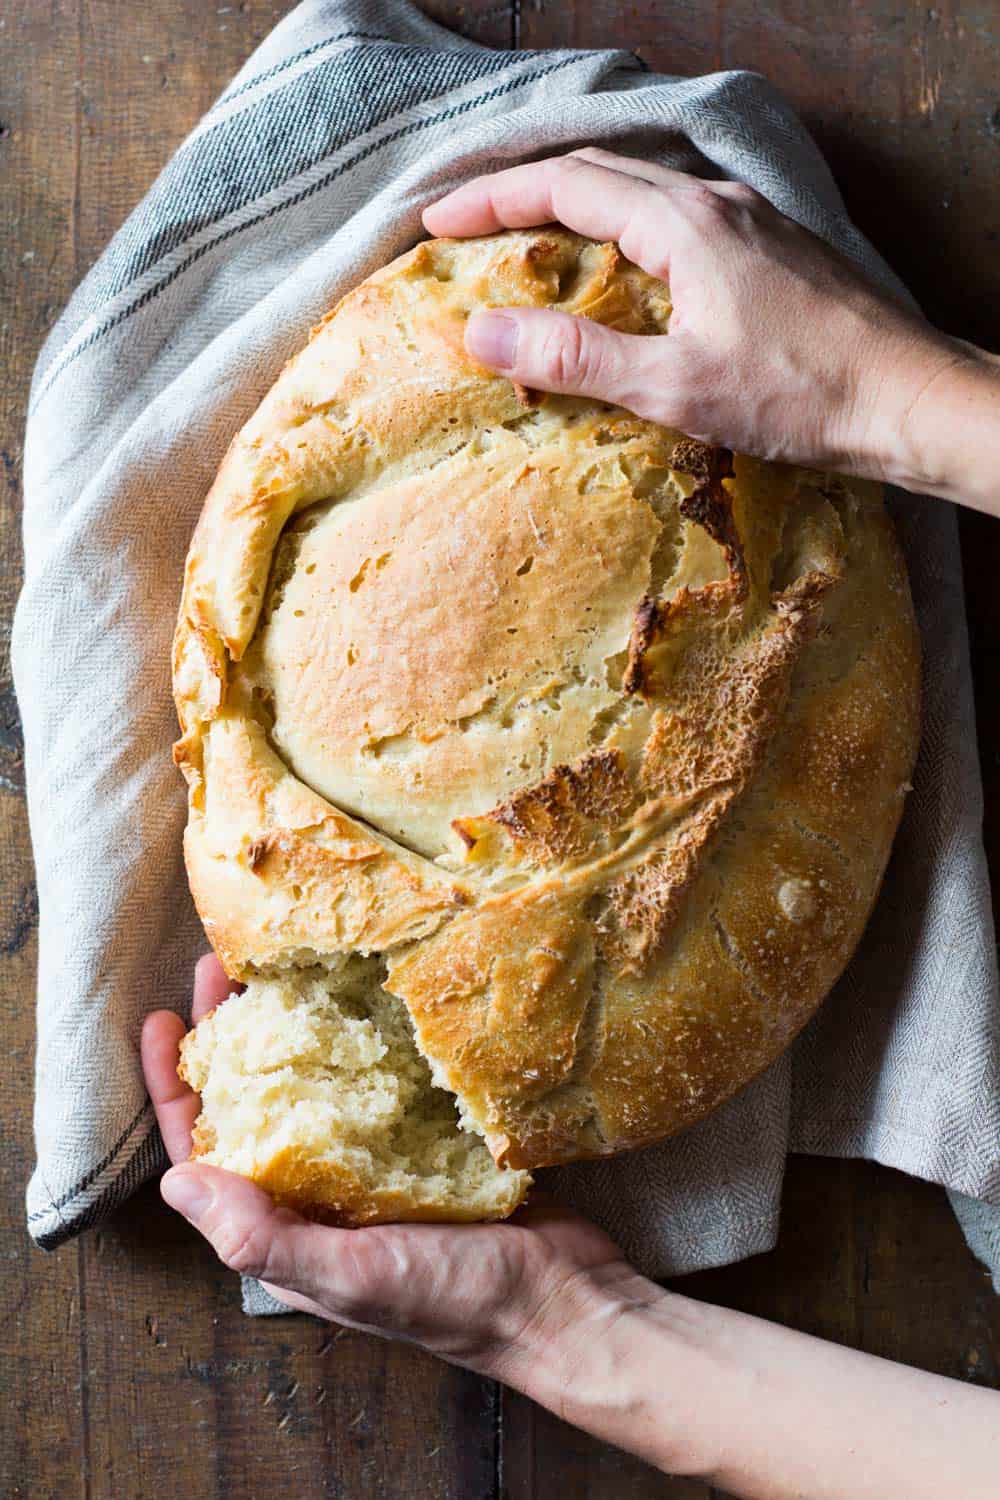
Don’t use a knife. Use your hands. Eat an uneven piece. It tastes so much better that way. Eat your first piece just like that. You can eat the second with butter or dunked into butternut squash soup. Eat the first piece just plain.
Once you ate all you could eat it’s time to store it. Put it in a paper bag and leave on the kitchen counter if you’ll finish it the same day. OR place in a paper bag and then plastic bag and place in the fridge. Since this Apple Yeast Bread contains fresh apples it shouldn’t be stored on the kitchen counter for too many days. Store it in the fridge from day 2 onward.
Phew. Are you ready to make bread now?
Apple Yeast Bread
Ingredients
- 220 ml (g) 100 F (38 C) warm water
- 7 g active dry yeast
- 220 g all-purpose unbleached white flour
- 800 g all-purpose unbleached white flour
- 7 g active dry yeast
- 480 ml (g) water
- 20 ml (g) milk
- 25 g sugar
- 1 pinch salt
- 1-2 large red apples
- extra flour
- cornmeal
Instructions
- Make starter In a medium bowl mix 220ml 100F-warm water (use a thermometer!) and 7g active dry yeast and let sit for 8-10 minutes until all bubbly. Then add in 220g flour and mix with a spatula. Cover with a clean kitchen towel and let rise at room temperature for 12 hours (overnight).
- Prepare the bread dough Add 800g flour, another 7g yeast salt, sugar and 480ml water and 20ml milk to the starter and knead on low for at least 20 minutes until the dough is sticky and elastic.
- First rise Cover the bowl in which the dough was kneaded with a clean kitchen towel and let rise for 45 minutes at room temperature.
- Add apples Peel and core apple, cut into small pieces and fold into the bread dough little by little.
- Second rise Transfer dough into a parchment paper lined bowl, cover with clean kitchen towel and let rise a second time for 45 minutes at room temperature. OR (preferred!): spread out a dish towel on the counter, sprinkle with abundant flour and corn meal and dump dough onto towel, then cover and let rise (see video for visual example).
- Preheat oven and dutch oven 15 minutes into the second rise preheat the oven to 450F with the dutch oven with lid inside the oven. The oven and dutch oven have to heat up at least 30 minutes.
- Bake the bread Take the dutch oven out of the oven carefully, lift the bread out of the bowl by holding the edges of the parchment paper up, turn around and dump into the burning hot dutch oven. OR take the turn the dish towel and dump the dough into the burning hot dutch oven. Place the lid on top and return into the oven. Bake 30 minutes with lid on and a further 10 minutes with lid off.
- Cool Bread Take dutch oven out of oven, remove bread from dutch oven, place on a cooling rack and let cool down completely before cutting into bread.
 Simple Apple Tart
 Moist Vanilla Cupcakes
 Acai Bowl
Jesus Bravo says
Hi Lorena,
I just made this recipe and loved it!! My wife and daughter that that they would like a sweeter version even more. Do you have any recommendations for making the final product sweeter? I thought about adding more sugar and maybe cinnamon. What do you think?
Jesus Bravo says
I apologize, I meant to write “thought that”, not “that that.”
Lorena says
Hi Jesus, I’m so happy you liked the bread. I’m not sure it would work if adding a lot of sugar, mostly because the dry to wet ratios would change so much. I can think of several ways to sweeten it a little more in different ways though. Sugar your apple pieces for example. Once you cut them into dice, add them to a bowl and add sugar and cinnamon and toss them until they are well coated, then add them to the dough together with maybe a cup of sultanas. The super soft and sweet raisins. That way you add sweetness without messing with the actual bread dough.
Erin says
Nice recipe, in all honesty. Please, please, please hire an editor.
Lorena says
?
Brianna says
Hi Lorena! I’m currently making this for a client. She wants more than one loaf but neither of us are certain on how it does if it’s frozen after baked. Have you ever made more than one loaf and frozen it to keep on hand?
Lorena says
Hi Brianna, I’ve never tested freezing this bread but I’ve frozen multiple different breads and they always keep really really well in the freezer. I don’t see why this one wouldn’t. I recommend cutting it in slices and then freeze on a baking sheet individually so they don’t stick to each other and then once frozen, add to a large freezer bag. That way they are separate and you can take out one slice at a time and defrost in the toaster or under the broiler :)
Jude says
Hello Lorena, I must try your apple yeast bread! Has any one converted this to American measurement? I could use a copy.
thanxx
Jude
Lorena says
Hey Jude, this recipe cannot be converted. 1 cup of flour weighs differently for absolutely everybody because it all depends how densely you stuff the cup with flour. For bread recipes I highly discourage people to use cups. A digital scale costs no more than 10 bucks on amazon and will be useful for many many other recipes. Bread recipes have to be VERY exact so they turn out. Using cups and other volume measurements I cannot guarantee it’ll turn out.
Jude says
thank you, i will start it tonight…..
Mike says
Hi I’m curious as I have a starter I’ve been using o all my breads, it’s awesome, three months old, what would the ratio be for using an existing starter? Cumulated weight nfor yoyr ingredients or ? Thanks eager to put this in the oven!
Mike
Lorena says
Oh gosh, I’m sorry Mike, I have no clue but just from logic I would assume it’s 447g in total. I used 220g of flour and 220ml of water (which weighs 220g) and 7g of yeast and I don’t see why those ingredients would change in weight just because they became a starter. They basically just inflate themselves with air bubbles which don’t weigh, right?
Karen Kellerman says
What size dutch oven does this recipe use? I have a round cast iron one, not sure of the size because it is packed up while my house is being built. I can’t wait to try this bread in my brand new kitchen. Also have you made this bread without the apples? I am looking for an artisan white bread for my husband. Also how do you store this bread from drying out while keeping it crusty? Sorry for so many questions, I used to make bread but its been years and wasn’t artisan.
Lorena says
Hey Karen, check out this post: https://greenhealthycooking.com/artisan-bread/ it goes a little into more detail. Yes, I’ve made the bread without apples, nuts or dried fruit just plain and simple and it is just as delicious. You simply leave out that step and that’s it. Nothing else you’ve got to pay attention to. The bread does stay fresh the longest in either a well ventilated wooden bread box at about 18 degrees celcius room temperature or if you don’t have one use that same dutch oven and store it in a cool place. A fresh 100% wheat bread like this one will only last 2 days though. I usually make it when I expect people over so we finish it all in one sitting OR I freeze half of it for when I know we’ll be able to eat the whole other half. A 6qt dutch oven will do for the recipe :)
Dimitri Silva says
This recipe is perfect. I recommend anyone who can do it, because it is very good.
Lorena says
Thank you so much for this lovely comment Dimitri :)
Roxanne says
Thank you, thank you, thank you for this recipe! I have been searching for an apple yeast bread that is not too sweet. I used to purchase apple breads in Seattle around the holidays for Christmas french toast. Now I live in Central Pennsylvania and learned to bake bread. Thank you for this recipe, it’s delicious!
Lorena says
Thank you, thank you, thank you, for coming back and commenting and for rating my recipe. I really appreciate it Roxanne. I’m so happy you like the recipe. It fills my heart with joy when people try my recipes :D
aspasm says
Hello – I’m relatively new to bread making. I’ve cut the recipe in half to cook it in a smaller dutch oven. Should I modify the baking times?
Lorena says
Hi! The baking time is reduced but only little. I did the exact same thing (half recipe last week) and I baked for 25 minutes covered plus 5 minutes uncovered. So in total I reduced cooking time only by 10 minutes. If it’s still too white you can always leave it in another 5 minutes uncovered. The way to tell if a bread is well baked is, right out of the oven knock on the bottom and if it sounds hollow it’s done. If it doesn’t sound hollow immediately return to hot dutch oven and back into hot oven for another 5-10 minutes.
aspasm says
Thank you so much! Just finishing the first prove right now!
Lorena says
wheeeeee :D Don’t forget to come back and tell me how everything went please!!
aspasm says
It was amazing! I added a bit of cinnamon and sugar to the apples and it was perfect. My family gobbled it up!
Lorena says
WOW!! What a great idea. I will ad cinnamon and a bit of sweetener to the apples next time, too! Thanks for the tip :D
Cynthia Walker says
Good morning,
My starter is all ready to go! I just measured out 25g of salt, it seems like a lot. Would I be able to cut it a bit?
Thanks!
Cynthia Walker says
I had to abort the mission, the large clump of dough I ended up with was not going to turn into a beautiful loaf of bread. I think I may have to adjust the salt.
Lorena says
Noooo, did you watch the video? The dough DOES look like a clump of sticky yucky goo. It does turn out amazing though. Did you try and bake it?
Lorena says
Hi Cynthia, yes you can cut it but I swear it’s not a lot of salt for such a big bread. It won’t taste salty at all.
Cynthia Walker says
I didn’t try it because it didn’t look anything like the video, almost like there was too much flour. I’ll give it another go :)
Lorena says
Oh no :( Did you use “all-purpose UNBLEACHED white flour”? It’s important. Different flours need different amounts in recipes. Also, did you weigh the flour? Conversions to cups are not accurate. Gah! Wish I could be there and bake with you, haha.
Brenda says
Hi Lorena,
It is me again. Sorry to bug you so much, but I would really like to get into bread baking seriously. I threw away my cast iron dutch oven because it was made in China. I have been researching all brands I can find for enameled cast iron dutch ovens and so far every brand has at least some part of the process performed in China or Thailand. How would a clay baker do?
Lorena says
Hi Brenda, no problem at all. I’m super excited that you want to start bread baking!! A brand that I really really like is Staub. It’s French/German and made in France. From what I know there are no Chinese-made parts in any of their cookware. Unfortunately, they are very expensive. They last a lifetime or even several if you properly take care of them. They can be handed down for generations, if you can afford them. I’m currently saving both for a dutch oven and a pan from Staub. I didn’t recommend them in the blog post because they are really expensive and I didn’t want people to think they can’t make my bread without one of them. The Lodge will do the job perfectly for a reasonable price tag. If you can afford a Staub, I HIGHLY recommend it. The quality is OUTSTANDING.
Brenda says
I have been looking a lot and some of the comments from buyers of Staub from Williams Sonoma and other places complained that their article was made in China and that this was never declared online. I tried to call Staub customer service today and was sent to voice mail. Will try to check this out. I saw some Staub dutch ovens on clearance at Tuesday Morning (still expensive), but I don’t want to spend a lot of money for something that comes in any degree from China. Even Lodge is doing their enameling in China.
Lorena says
Calling them is a good idea but I recommend either direct messaging them on Facebook or sending a tweet. Most companies with a considerable amount of social followers “work” on their social media and want to keep their social media fairy dust. Facebook and twitter like engaged pages and fast responders so pages do what’s needed ;) You’ll get a quicker response than e-mailing or calling. I’m sure.
Brenda says
Thanks Lorena, and how do you think a clay baker would do with this bread? Any thoughts on using a clay baker with bread baking in general?
Lorena says
Hey Brenda. It *might work but not the same way as cast iron. The thing is a cast iron pan heats up amazingly and most importantly maintains the heat even when you take it out of the oven. Now, will your bread turn out horrible without one? NOOOO!!! I’v made bread on a simply baking sheet. It doesn’t rise “as much” but it’s not like it won’t turn out or not rise at all. It still comes out pretty amazing! A clay baker might work wonderfully. Let me know if you try.
Brenda says
OK, let me count the ways you have inspired and helped me. Because of you, I did a lot of research into enameled cast iron dutch ovens and Staub did reply that all parts of their dutch ovens are made in France, but that their ceramic items are made in China. Tuesday Morning had some Staub dutch ovens on sale, 40% off their discounted price! I wanted the Cocotte oval baker, similar to the KitchenAid you used, but the larger round oven with grill pan lid was also there. I debated a long time and….bought BOTH for less than I could buy one at the retail price! I LOVE them. I cooked a chicken with vegetables in the larger one in the oven and pinto beans on the stove and made your bread in the smaller, oval one. I knew my bread would not be quite like yours because I used my home ground hard white wheat (the whole grain) and not AP. The bread is very good, though different from your light, airy look. I added toasted walnuts and stirred my apples with a little coconut sugar, cardamom, cinnamon and nutmeg before adding. I love it also toasted with cream cheese and a sprinkling of cinnamon sugar on top for breakfast. What a winner! I am going to make it again with AP (even though my home ground is healthier) just to see how it turns out for me. Yours looks so wonderful. Mine is more hefty, but WONDERFUL! It was well behaved at each step of the way. What a wonderful bread. I’m doing my happy dance. Thank-you so much for this amazing journey. I have pulled out several cookbooks and now I’m off to explore the talents of my new Staub family members. You are my new best friend, Lorena! for life! Thank-you.
Lorena says
Brenda, your beautiful comment made me cry. For real! You have no idea how happy your journey makes me. This, exactly this, is why I started my blog. To help other people discover the kitchen and delicious simple recipes made with love and dedication. I’m also happy you did all that research on dutch ovens, more reason for me to put in more effort into filling up that piggy bank for a Staub. For now I had to buy a cheap one at West Elm. Next will be a Staub for sure. Can’t wait. Good thing for you is, I’ll be making quite a few dutch oven recipes and breads on the blog :D Next will be another bread I’ve had in mind forEVER!
Brenda says
This bread is gorgeous!! I want to make it. It looks like you used an oval dutch oven. Would you tell me the quart size of the dutch oven? Is it a Lodge enameled?
Lorena says
Hi Brenda,
the dutch oven I used to make this bread (the one in the photos) is a 4.3 qt KitchenAid enameled dutch oven. I haven’t seen it being sold on Amazon or anywhere else. A friend gave it to me for the recipe and I just borrowed it again to make the video for the post this week. An enameled Lodge will do the trick or pretty much any dutch oven really, even a round one :)
Jackie says
I am currently baking this and I can’t wait for it to finish! It’s gone smoothly except for when I tried to turn the dough out into the dutch oven, it stuck to the parchment paper! I got the majority into the pan but I couldn’t get all the extra off of the paper… are you sure it is parchment paper and not wax paper? Or was I supposed to spray the parchment paper with non-stick spray before letting the dough rise a second time?
Lorena says
Hi Jackie, I used parchment because I don’t like when wax paper leaves the waxy flavor on my food. Yes, it sticks a little but as long as 90% of the dough end up in the pot you should be fine. The other option is to just lift the dough with the parchment paper and place it in the dutch oven. I’m not exactly sure if it will stick to the dough then though? Let me know how you liked the bread :D
Cassandra says
Where do you add the milk salt and sugar? I don’t see them in your instructions anywhere.
Lorena says
Hi Cassandra,
I’m so sorry. I completely missed that. You add it when you also add the flour and water to the starter. I just corrected the instructions.
Karly says
I think I’ve officially decided that this bread is more attractive than I am. And probably most people in this world. Not that I’m mad about it. Seriously, LOVE everything about this! Need to try it soon!
Lorena says
Hahahaha, Karly, don’t say that! You are beautiful and no bread in the world can be a competition :)
Joan says
How about putting the Recieps in English as some of us do not speak French . If it was in English I surly make this bread.Joan
Lorena says
HUH?!? My whole blog is in English. I speak hardly any French, hahaha. Why would you write a comment like that?
Brenda says
what are they talking about here?