The most detailed step by step instructions on how to make Artisan Bread. Add whatever nuts and dried fruit you like to give it a personal spin. I made mine a Walnut Fig Artisan Bread. Spread some goat cheese on a piece and fly to HEAVEN!
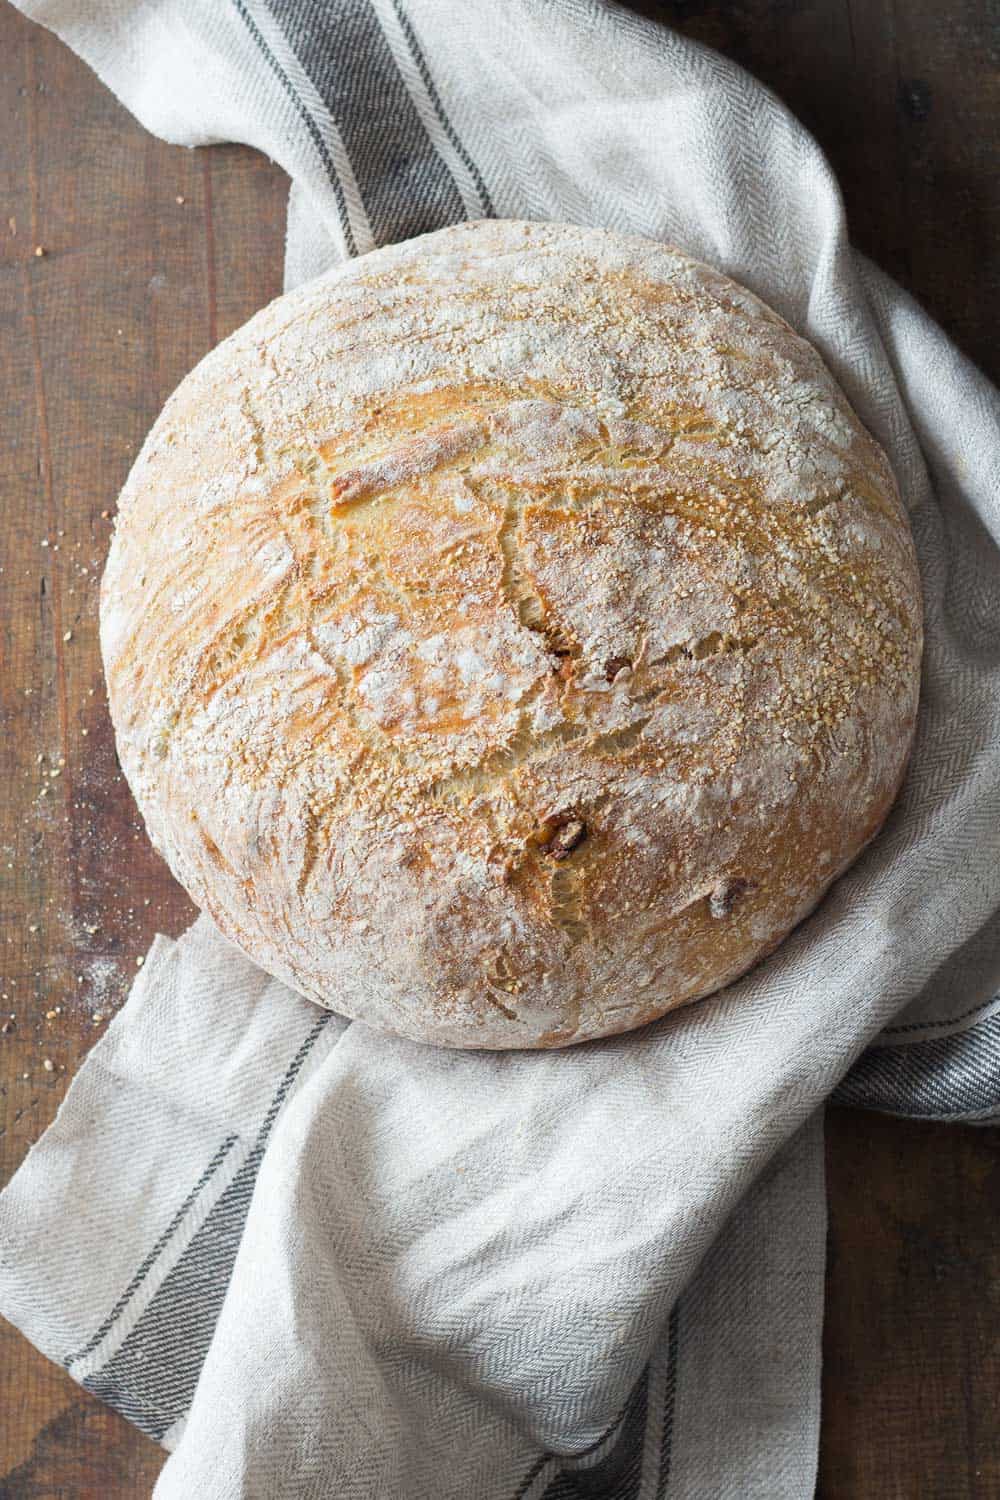
This is not a quick bread, this is a real artisan bread. 12-hour starter, knead, rise, (fold in extra flavorful extras), rise again, bake, give it a bite and book a flight to Montreal to come hug and kiss me ;)
Ok, so, is it easy to make artisan bread? Ummmm, let’s say it’s not difficult. There are several steps that need extra attention but in this post I will walk you through ALLLLL the steps one step at a time so you end up with the best bread you’ve tried in your life, pinky finger promise. Are you ready?
How to activate yeast and ensure artisan bread dough rises
Proof your yeast
I cannot stress this more. I just wasted 1.5 kg of flour over the weekend trying to succeed in the bread-making business. If you proof your yeast first you don’t risk waisting flour. If your dough doesn’t rise it’s because your yeast was not properly activated or worse, you killed it. Awww, poor yeast :(
How to proof yeast
Add yeast to a bowl and then add warm water. Now here is the first tricky part. The water has to be “warm”. What does “warm” mean? About 100F (38 C).
Use a thermometer, if you don’t have one for food, use your body temperature thermometer. If you don’t have that either, use your elbow.
It should be warm like water you would bathe a baby in, milk you would give a baby in a bottle. If you have nothing to do with babies and don’t know what kind of warm is meant by that, well, warm like your own pee ;)
The end result after about 10 minutes is foamy, bubbly, yeast-smelling water. If it doesn’t foam and bubble, toss it. Your bread won’t rise. I will come out dense and heavy and maybe even uncooked in the end. Do not waste your flour. Start over again. Remember it’s just 10 minutes.
Now, how come yeast doesn’t foam or bubble sometimes? There are 3 reasons for things going wrong.
- the yeast expired -> buy another one.
- the water was too hot or too cold -> use a thermometer to make sure the temperature is right.
- your tap water is no bueno (too much chlorine or bacteria can kill your yeast) -> Use bottled water.
Prepare a starter
Breads made with starters taste so so so so so so (that’s not enough ‘so’s but you get the point) much more delicious than other breads. AND, the bread dough rises beautifully with a starter.
Prepare a starter. Just do it, will you?
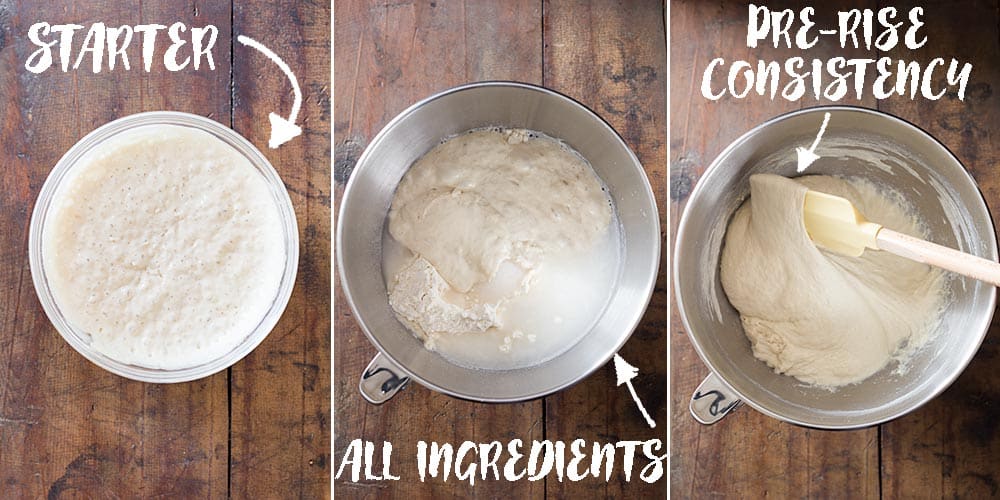
Mix that foamy, bubbly, yeasty water (a.k.a. proofed yeast) with the flour required by the recipe, cover and leave at room temperature for at least 12 hours, max 18 hours.
The next day you will start your bread-making process like you would any bread without a starter. Making a starter takes 12-ish minutes. Make that starter the day before. You will get the most perfect result.
How to achieve dense but airy Artisan Bread
Artisan bread requires several rises. The quicker a bread is to make the lighter and cakier (is that a word?) it will be. Basically, less time and less rises equal less deliciousness in my opinion.
This real artisan bread calls for a 12-hour rise of the starter and then another two 45-minute rises. Remember, you don’t have to do absolutely anything while the bread is rising. Making bread is a long process BUT requires only minutes of actual work in between rising/resting time. In total it will take maybe 10 minutes of you actively doing something.
Knead the starter and remaining flour the recipe calls for in the stand mixer with dough hook attached for a good 20 minutes on low. You can do this part by hand but it will be VERY messy and tiring. I don’t recommend doing this by hand but rather borrow a stand mixer if you don’t have one.
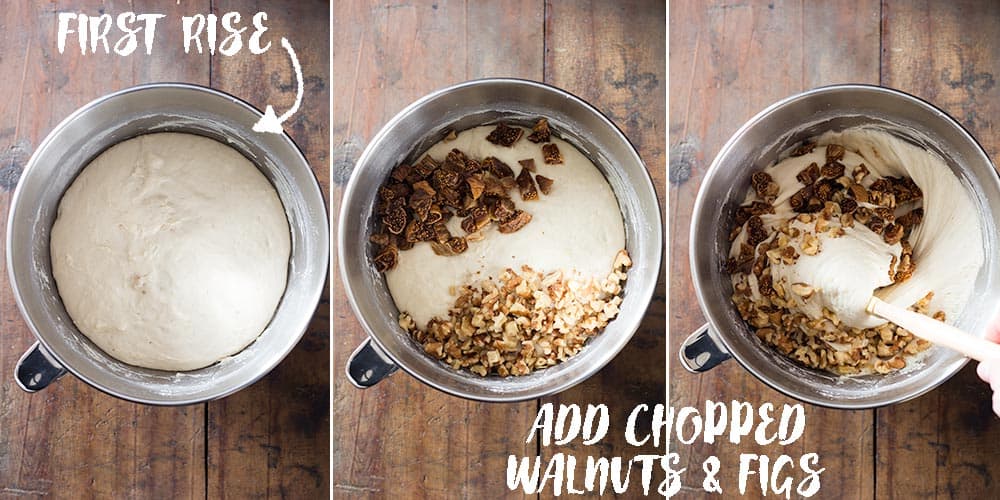
The dough should be very sticky and elastic (see right photo above). Cover it with a clean kitchen towel and let rise at room temperature for 45 minutes or until the dough has doubled in size (see left photo below).
When and how to add extras to artisan bread dough
After the first rise it’s time to fold in whatever extras you want to fold into your artisan bread. If you don’t want anything extra in your bread just omit this step.
Add extras and fold and fold until well combined. By then the dough reduced in size again. (see middle and right photo above).
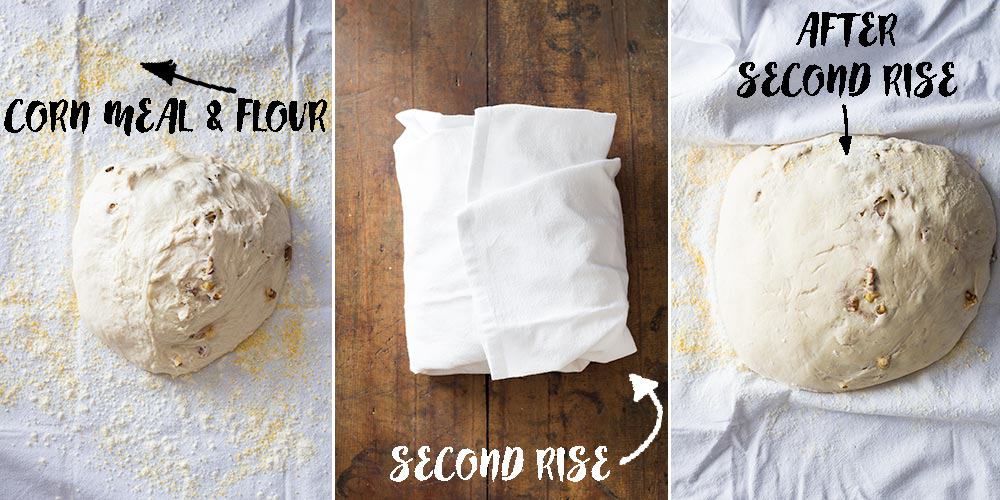
Once all the extras are mixed into the dough it’s time for the second rise. Cover a clean dish towel with abundant flour and corn meal. Dump the dough onto the dishtowel and fold the towel over it.
Emphasis on “abundant” so no dough at all stays stuck to the dish towel. You should be able to shake it out in the kitchen sink, throw it in the wash that’s it once you removed the dough after the second rise.
Dutch oven vs. no dutch oven when making artisan bread
There are two reasons artisan bread will form a dome. One, the bread dough is given enough opportunities to rise. Two, the bread dough is baked in strong heat coming from all directions.
Most of us have regular ovens. Heat from the top and heat from the bottom. That’s it. Regular home ovens do not emit heat from all around.
Bakeries have special ovens. Many of their ovens are stone ovens where the stone retains all the heat and radiates it back to the whole surface of the bread.
The only way to “imitate” this is by using a dutch oven. I’ve tried with a oven-proof stainless steel pot with oven-proof glass lid and … it doesn’t work. Stainless steel doesn’t “store” heat. It becomes hot, yes, but as soon as you take it out of the oven to dump in the bread dough, it immediately starts cooling down.
A cast-iron pot keeps the heat for muuuuch longer. Enough time for you to dump in the dough, put the lid back on and transfer back in the oven without it cooling down even 1 degree.
If you don’t have a dutch oven here are my 3 suggestions.
- BUY ONE! It’s worth it! There is one for all budgets. This $50 dutch oven does the trick perfectly well. And this $300 dutch oven is not only a life-time investment but also a pot to hand down a couple generations if you take care of it properly.
- Borrow one! If you can’t afford one right now or you first want to test it before buying, ask around who can borrow you one. I did that before, too. I was sold after the first use but still borrowed it again until I had the money to buy one for myself.
- Don’t make this bread. Sorry, but I tried making artisan bread without a dutch oven and I REALLY wanted it to work but it just doesn’t. :(
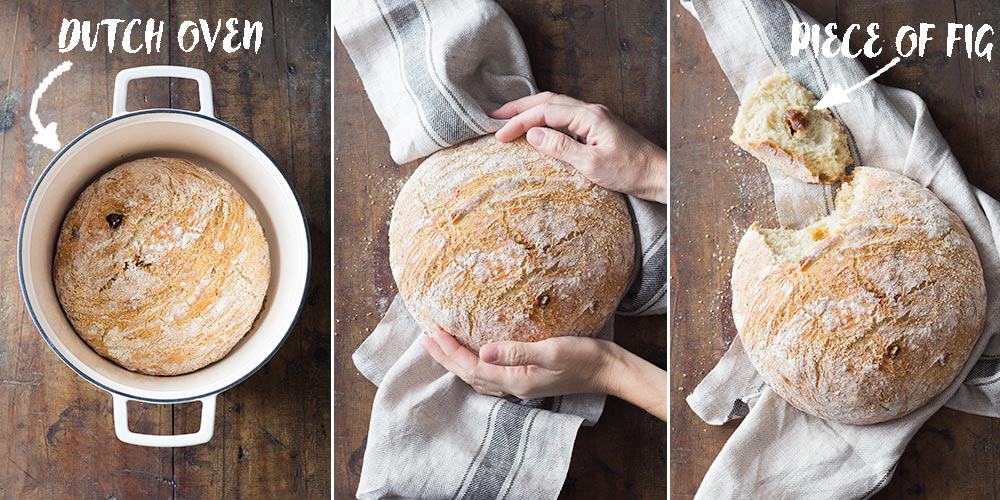
One important tip: be really, really, really, really, really, really careful when taking the dutch oven out of the oven. It will be BURNING HOT! Use very thick silicone oven gloves or double up your regular cloth gloves. The burns you get from a hot dutch oven are unbelievably painful. All concentration is required here. Don’t multitask at this point. Do only ONE thing. Keep your eyes only on the oven and your body parts.
Artisan Bread cooling instructions
This point is also very important. Once the bread is baked you have to remove it from the dutch oven (carefully, remember it’s hot!). Since the dutch oven retains a lot of heat for an extended amount of time it’s crucial to remove the bread so it doesn’t continue baking. Otherwise it will become very hard.
Turn the dutch oven over so the artisan bread falls out. It will immediately and easily fall out. There is no way bread dough will stick to a burning hot cast iron pot or pan. If it sticks, you didn’t heat it up enough time (as I suggested further up) naughty you ;)
Place the freshly baked artisan bread on a cooling rack and wait for it to COMPLETELY cool down before cutting into it. If you cut into hot bread all the steam escapes and the center stays “doughy”. The bread needs to cool down slowly for the steam to do it’s work on the inside of the artisan bread.
How do I know my bread is really baked through without cutting into it? Knock on the bottom of the bread. If it sounds hollow it’s done. If it doesn’t return to the oven.
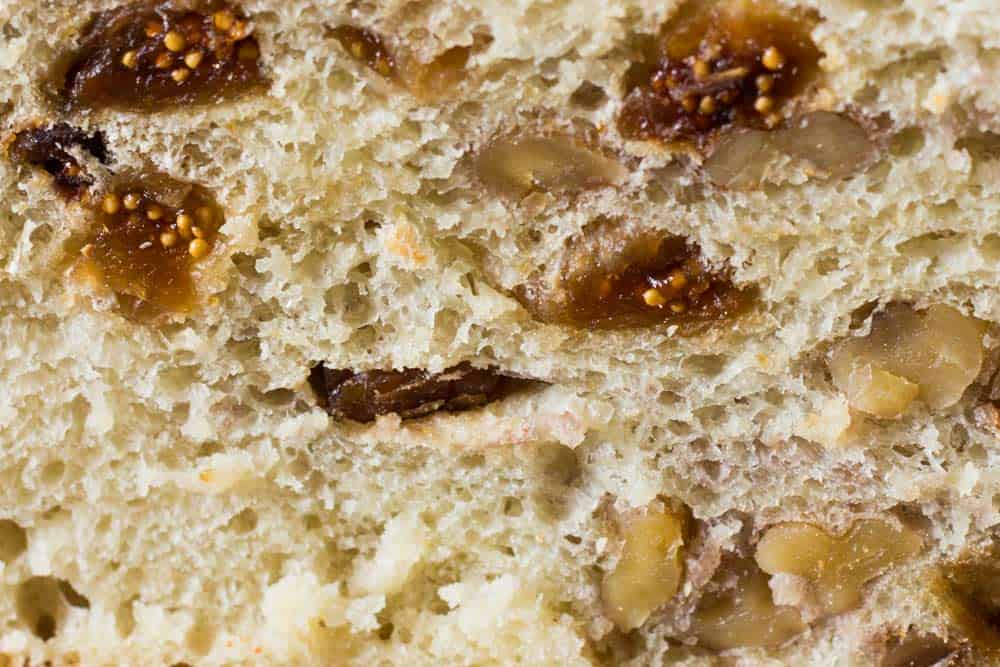
And this is what it looks like from the inside once it’s finished cooling down:
How to store Artisan Bread
I can’t believe you’ve made it this far reading. Congratulations. Now it’s time to finally, finally break apart a piece of this masterpiece of a healthy artisan bread.
Don’t use a knife. Use your hands. Eat an uneven piece. It tastes so much better that way. Eat your first piece just like that. You can eat the second with goat cheese or butter or dunked into butternut squash soup. Eat the first piece just plain.
Once you ate all you could eat it’s time to store it. If you think you will finish the bread the next day I recommend storing it in a paper bag on the kitchen counter. That way it stays crispy.
However, bread dries out by the end of day two. If you know you won’t be able to finish it by day two I recommend storing it in a paper bag and then plastic bag on top and tie a tight knot and leave it on the counter if you’ve added only nuts and dried fruit but in the fridge if you’ve added fresh fruit.
Phew. Are you ready to make bread now? Check the shorter version of all instructions further down in the recipe card.
Artisan Bread
Ingredients
- 110 ml warm water - (100°F / 38°C!!)
- 3.5 g active dry yeast
- 110 g all purpose flour
- 400 g all purpose flour
- 3.5 g active dry yeast
- 240 ml water
- 10 ml cow's milk
- 12 g sea salt
- 1 pinch sugar
- 2-3 Tbsp all purpose flour
- 2-3 Tbsp corn meal - (not corn flour! corn MEAL!)
- 1/2 cup chopped nuts - (I used walnuts)
- 1/2 cups dried fruit - (I used figs)
Instructions
- *Proof the yeast and prepare starter* In a medium bowl mix 110ml 100°F-warm water (use a thermometer!) and 3.5g active dry yeast and let sit for 8-10 minutes until all bubbly (<- this is called "proofing the yeast"). Then add in 110g flour and mix with a spatula. Cover with a clean kitchen towel and let rise at room temperature for 12 hours (overnight).
- *Prepare the bread dough* Add 400g flour, another 3.5g yeast, salt, sugar and 240ml water and 10ml milk to the starter and knead on low for at least 20 minutes until the dough is sticky and elastic.
- *First rise* Cover the bowl in which the dough was kneaded with a clean kitchen towel and let rise for 45 minutes at room temperature.
- *Add extras* Chop walnuts and dried figs or any other nut and dried fruit and fold into the dough. Omit this step if you want your artisan bread plain.
- *Second rice* Spread out a dish towel on the counter, sprinkle with abundant flour and corn meal and dump dough onto towel, then fold dish towel over bread and let rise a second time for 45 minutes.
- *Preheat oven and dutch oven* 15 minutes into the second rise preheat the oven to 450F with the dutch oven with lid inside the oven. The oven and dutch oven have to heat up at least 30 minutes.
- *Bake the bread* Take the dutch oven out of the oven carefully, turn the dish towel and dump the dough into the burning hot dutch oven (be carful with the hot dutch oven!!!!). Place the lid on top and return into the oven. Bake 25 minutes with lid on and a further 5-10 minutes with lid off. Until golden.
- *Cool Bread* Take dutch oven out of oven, remove bread from dutch oven, place bread on a cooling rack and let cool down completely before cutting into it.


 Tender Lamb Stew with Homemade Potato Mash
 Clean Eating Meal Plan – 1 full day prepped in 40 mins
 Apple Yeast Bread
Sylvia Talamantez says
Why did my 1st rise stay like a thick pancake batter? I don’t think I added enough flour to it. I tried converting from metric to standard “cups and teaspoons”. I checked and rechecked all the measurements. 110 ml water is 4 oz. plus 2 tsp. 3.5 yeast is 1 tsp. 110 G. is 1 cup flour. 400 g. is2 1/2 cups flour. 3.5 yeast is 1 tsp. 240 ml. is 1 cup plus 2 1/2 tsp. water. 10 ml. is 2 tsp. milk. 12 G. is2 tsp. plus 18/8 tsp. Sea Salt. The rest of the recipe I can understand. I think there is too much liquid or not enough flour. I messed up.
Lorena Grater says
Hi Sylvia, unfortunately for bread recipes it’s super important to use exact measurements. The US system of cups and spoons will never give you exact measurements that’s why I used metric for this even though I use imperial for all my other recipes. You can get a digital scale for as little as $15. I highly recommend you get one for bread-baking. Inexact measuring systems can and most of the times DO lead to inbalance of wet and dry ingredients. Which for regular cooking and some basic baking isnt’ that big of an issue but for bread-baking it’s everything. You might also have added water that’s too hot and killed your yeast with the hot water and that way it didn’t work the dough.
Marcy says
Can I use buttermilk?
Lorena Grater says
I’m sorry, I don’t know. I’ve never tried.
Terre Kannon Tulsiak says
I only had powdered and brown sugar so used powdered and it didn’t rise. My water also has lots of chloramine so maybe it killed the yeast. Trial and error…
Lorena Grater says
Oh no. I don’t think the powdered sugar was the problem to be honest but I’ve never tried getting yeast to react with powdered sugar, so maybe. Next time try regular white sugar and bottled water just in case.
Elizabeth Tomlin says
Love love love this recipe! Comes out great every time. Thank you so much :)
Elizabeth Tomlin says
Fantastic recipe! I actually had to add a little more water than the recipe said to get a slightly sticky dough. I also used this recipe base to make cheese bread and it is awesome!
Lorena Graeter says
Thank you so much for coming back and leaving a review. It’s very interesting that you needed more water. I wonder if the grind of flour plays a role? I am definitely glad I made step-by-step photos so everybody could be successful regardless of flour brands. It is still very interesting and something I will consider adding to the notes it someone else mentions it, too. Thank you so much for taking the time.
Linda Teders says
Yes, the grind does play a rol; courser grind tends to be thirstier
Chantal says
Hi! I don’t have a dutch oven but I do have a cast iron pot with a cast iron lid. I understand that a dutch oven is basically enamel-covered cast iron, so will I be able to use the plain cast iron pot? Can’t wait to try this! Chantal x
Emilia says
Could I use instant yeast for this? It’s all I have at home :(
Lorena Grater says
Unfortunately, I don’t know. I have never tried myself and can’t try now because I don’t have any yeast at all at home or in the stores :(
Karen Borst says
Love this bread. The recipe i have must be for a larger loaf as everything is double.
I give it out as gifts.
Linda Teders says
You surely can. But since last year, youy will probabely have found this out allready. I hope?
Christine says
I am going to try this! Can a person keep a “starter” going on the counter or in the fridge, kinda like sour dough?
Lorena says
Hi Christine, I’m not 100% sure. I’ve never tried for this bread starter but I would assume you can?
Jean says
I use my bread machine for mixing then take out for the 1st rise. Will that work. Also I can only find quick rise yeast. Can I use that?
Lorena says
I’m sorry, I’ve never worked with a bread machine so I’m not sure. Quick rise yeast will not work for this recipe, I’m sorry.
Amy says
Hi, I avoid all purpose flower for health reasons, what can I use as a substitute?
Lorena says
You cannot make artisan bread with any other flour. If you want to make gluten-free bread you will have to make a recipe that has been tested with gluten-free flour. This recipe will not work with any other flour other than all-purpose white flour. I’m sorry.
Sandy says
Hi Lorena
I’ve been having some spectacular flops (as in no second rise) and I was worried when I went to put the dough in the dutch oven. It spread rather than raised so I ended up with a fold. What came out was bread with a great crust, nice moist crumb and lots of flavor! Thank you for such good instructions and a great recipe!!!
Lorena says
I’m so glad your bread still turned out great Sandy. Unfortunately, I’m not the most experienced bread baker. I often don’t understand why things don’t turn out. Still learning myself. This bread I’ve made very very often with great results so I wanted to give instructions as detailed as possible. I wonder if it maybe got a bit too cool in your kitchen for the second rise?
LINDA DRALLOS says
Lorena,
Recently came across your website searching for clean food recipes. So looking forward to making this artisan bread, but alas, being from the States, I’m having a difficult time converting recipe to non-metric. I used some of the converter websites, but it will be difficult to follow since (for example, I will have to guess at what .7 tsp is to match the 3.5 g of active dry yeast. Do you have any suggestions? Also, I have friends who are dairy-free, what would you recommend for the substitute to the cow’s milk? I am so excited to try this recipe as well as the Easy Farro Spring Salad that sounds so amazingly delicious!
Lorena says
Hi Linda, I use imperial measurements for all my recipes but bread because there simply is NO way to be successful at bread-making when using such inexact measurements. The only way to get consistent results is using exact measurements and that’s only given when using grams. The problem with volume measurements is that everybody loads a cup and teaspoon differently and there can be huge differences in quantity. For most recipes, it doesn’t matter but for bread, it makes a huge difference. I highly recommend getting a digital scale. You can get one for as cheap as $10 bucks on Amazon and you’ll be able to use it for years and for many many recipes. In this recipe, you can replace the milk with water. The taste will only be minimally different.
Jon says
Would you recommend using parchment paper in the Dutch oven while it is cooking? I’ve tried a few other recipes and had trouble with the bread sticking to the pot. Perhaps I just never put enough flour on the bottom?
Lorena says
Hi Jon, no, I don’t put parchment paper down. If your bread sticks to the bottom it means your dutch oven wasn’t hot enough when you but the bread in. It has to be buuuurning hot, you flop the bread dough in and it basically immediately cooks. That applies to pretty much anything you cook in cast iron. If your egg sticks to the cast iron pan it’s because the pan wasn’t hot enough. All cast iron is naturally non-stick as long as it’s hot enough.
Lori Ann says
Purchased my first Dutch oven today just to try this! Wwhhooooo! Can’t wait!
Lorena says
I’m so excited for you Lori! You will absolutely LOOOOOVE this bread!
Roland Lima says
Made your bread! Ridiculousy tasty!!! Great idea with the Dutch Oven, makes total sense and worked great.
I am from Germany and miss great European bread, I have made some decent bread, but this was great.
Thank you very much for posting!
FYI, my wife will not let me fly up to Canada to kiss you 😃
Lorena says
Hahahahaha, cyber hug!
Mary says
Hello this bread looks delicious! Could you use a bread machine?
Lorena says
Thank you Mary. I’m sorry I have no advice on that. Never owned or even seen one so I don’t know how they work.
Ann says
This is great Lorena! I’ve made lots of homemade bread but never with a starter. Definitely making this my next weekend project. Thanks for the detailed instructions and the inspiration :)
Lorena says
You are very welcome Ann :) I hope you like your bread with starter :)